
Textured
Slatwall Panels
|
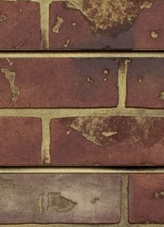 Create dramatic wall displays with our stunningly realistic
3D Textured Slatwall Panels. Available in assorted colors of brick, slate, distressed wood, concrete and more!
Create dramatic wall displays with our stunningly realistic
3D Textured Slatwall Panels. Available in assorted colors of brick, slate, distressed wood, concrete and more!
|
Slatwall Panels
& Displays
|
Display products with our
slatwall panels
in solid colors and woodgrains
|
|
Slatwall Installation - How to Install Slatwall Panels
Home >
Slatwall Panels /
Textured Slatwall
> Slatwall Installation
We recommend installation of
Slatwall
Panels by a licensed and insured contractor.
Following are instructions and information on how to install slatwall panels,
if you choose to do the job yourself ( DIY ).
You'll need a basic understanding of the slatwall display system to
properly install your panels. Slatwall is a wall paneling material
used to display, store, and organize items on your wall.
The panels have slots or grooves which are used to hang shelving, hooks,
wire baskets and many other accessories. The panel itself is a 4 ft x 8 ft, medium density
fiberboard material that weighs approx 85 lbs.
The slatwall installation process will require at least one helper, but two
will make the job easier.
It is important to first estimate the number of slatwall
panels required to cover the desired wall. Each 4 ft x 8 ft slatwall panel
covers 32 square feet of wall area. To determine the
number of slatwall panels you will need, first measure the length and height of the area
to be covered (in feet).
Then, using these measurements, multiply
the length times the height (in feet) to determine the total area. Finally, divide the
total area by 32 (the square feet covered by one panel), rounding up to the next whole
number.
This is the minimum number of
panels required to cover this area. As with any panel material, you should
order an additional 10% or more slatwall to account for
cuts and waste when installing.
Preparing to Install Slatwall Panels
First consult your local building codes and always obtain the proper permits
to install slatwall panels.
You will need the following items to complete the slatwall installation:
- Drill or screwgun
- Circular Saw or Table Saw
- Jigsaw
- 24" or Longer Level
- Stud Finder
- Tape Measure
- Safety Glasses
|
- Ladder
- Pencil / Marker
- Screws
- Panel adhesive (optional)
- Trim / Molding with paint / stain
- At least one helper
|
|
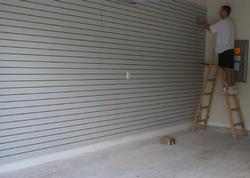 An installer finishes attaching an upper
slatwall
panel on a long slat wall
An installer finishes attaching an upper
slatwall
panel on a long slat wall
|
|
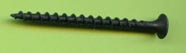
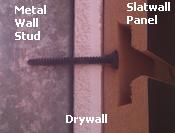
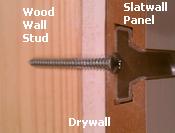
Slatwall Panels are installed with 2" to 3" long screws into the wall studs.
Determine the type of wall stud material you are applying the slatwall panels onto.
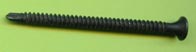
For wood studs, you'll need coarse threaded drywall screws.
Use self-tapping (self drilling) drywall screws for installation over metal studs.
When installing slatwall panels with aluminum groove inserts, use pan head screws
through pre-drilled holes into the wall studs.
|
|
|

|
|
Use coarse threaded drywall screws to install slatwall onto wood wall studs
|
Use self tapping drywall screws to install slatwall onto metal wall studs
|
Use pan head screws to install slatwall with aluminum groove inserts
|
Cutting Slatwall Panels
Slatwall panels
can be cut very easily. For straight cuts use a table saw and cut the
slatwall panel face
UP, or use a circular saw and cut the panel face DOWN. Use a sharp blade with
60-80 teeth and set the blade depth to 1 inch or just enough to cut through the slatwall
panel. Using a straight edge or level as a guide will help to keep cuts accurate
when using a circular saw.
For irregularly shaped cuts, including outlet and light switch cut-outs, use a
jig saw with a medium wood cutting blade, approximately 10 teeth per inch.
Mark and cut the back of the panel, face down, to avoid scratching the finish
of the slatwall panel with the saw.

Hanging Slatwall Panels
Begin by locating and marking the position of the wall studs with a stud finder, prior to
installation, and transfer these locations to the slatwall panel grooves.
Always level each slatwall panel before installation. The first slatwall panel on
a wall will be the most important, as all other panels will be
aligned from this panel.
Slatwall is typically installed over drywall or the existing finished wall material.
It may also be installed directly to bare wall stud, if permitted by building code.
Drill screws through the Slatwall grooves and into the wall studs.
Use a minimum of 24 screws, spaced evenly for each panel.
For a more permanent installation, a general purpose panel adhesive
may also be applied to the back of each slatwall panel before hanging.
Work from the floor up to the ceiling, stacking each slatwall panel on top of the panel
below. It is best to position the end seams of the slatwall panels on a stud location,
wherever possible.
This will reduce buckling and keep seams flush to the wall.
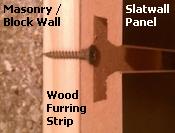
Slatwall Panels over Masonry Walls
Masonry walls should first be framed with wood studs or furring strips,
to meet local building codes. Then slatwall panels may be
attached directly to the newly installed wood using the above procedures.
Installing Slatwall Panels with Aluminum Inserts
If your slatwall panels have
aluminum groove inserts,
use 2" to 3", #6 or
larger, pan head screws.
Begin by locating and marking the position of the wall studs with a stud finder, prior to
installation, and transfer these locations to the slatwall panel grooves.
Do not remove the aluminum groove inserts during installation, as they
maintain the strength integrity of the panel.
It will be necessary to first pre-drill a pilot hole through the
aluminum groove insert.
The screws should then go through the pre-drilled holes and into the wall stud
to secure each slatwall panel.
It is recommended to install screws through every
aluminum groove at each stud location, effectively fastening each aluminum groove
to a wall stud independently. Fastening the groove to the wall stud, creates the weight
bearing capacity of the panel.
When installing one panel above another
it will be necessary to manually add the additional aluminum groove
insert in the slot where the 2 panels adjoin. The insert should be placed in the groove
before the upper panel is attached.
Finishing and Trim for Slatwall
Slatwall panels usually look best when installed
continuously from the floor to the ceiling. Any exposed edges of slatwall panels
may be finished with a variety of trim options. 3/4" quarter round molding or angle molding may be painted
or stained to compliment the slat wall display or existing decor. Baseboards and crown
molding may also be installed over the slatwall panels for a more decorative appearance.
Visible screw heads in unfinished slatwall grooves / slots may be covered using colored
slatwall groove inserts.
Install the groove insert strips from the front or
end of the panel and cut to the proper length for each slot.
Slatwall Accessories
Once all the installation of all slatwal panels has been completed,
the design and layout of the slatwall accessories must be considered.
Choosing the correct
slatwall accessories
is the final step in configuring the slatwall display system.
A wide range of accessories, hanging displays, hooks, brackets, fixtures,
wire displays,
and
acrylic displays
are available for use on the industry standard slatwall display system.
Many slatwall accessories are also available to display specific items
on slatwall panels such as
T-Shirts,
shoes,
hats, etc.
When configuring a slat wall display, the area at eye level, between 5 ft and 6 ft height,
should display the items requiring the most emphasis and ease of access.
Areas above 7 ft are often used for display and storage of bulk items or hanging
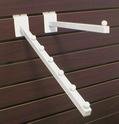
clothing which may be reached by using a
hanger retrieval hook.
Lower areas, from the floor to 5 ft, are frequently set up with large more
stationary items, displayed on
slatwall shelves.
Care should be taken to avoid longer slatwall accessories or hooks at lower
levels, as these areas are harder to access and small merchandise could
be easily damaged by customer foot traffic and shopping carts.
Slatwall baskets
are often used to conveniently display loose items, while
keeping them visible.
Signage is also an important part of a slatwall display and
acrylic sign holders
for slatwall or
shelves
with an integrated sign lip may be used to keep items well marked.
|
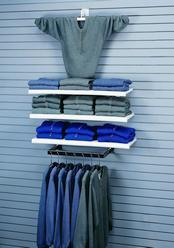 Slatwall Accessories and
shelves
are used to display clothing on a
slatwall display
Slatwall Accessories and
shelves
are used to display clothing on a
slatwall display
|
|